The Best Fluffy Pancakes recipe you will fall in love with. Full of tips and tricks to help you make the best pancakes.
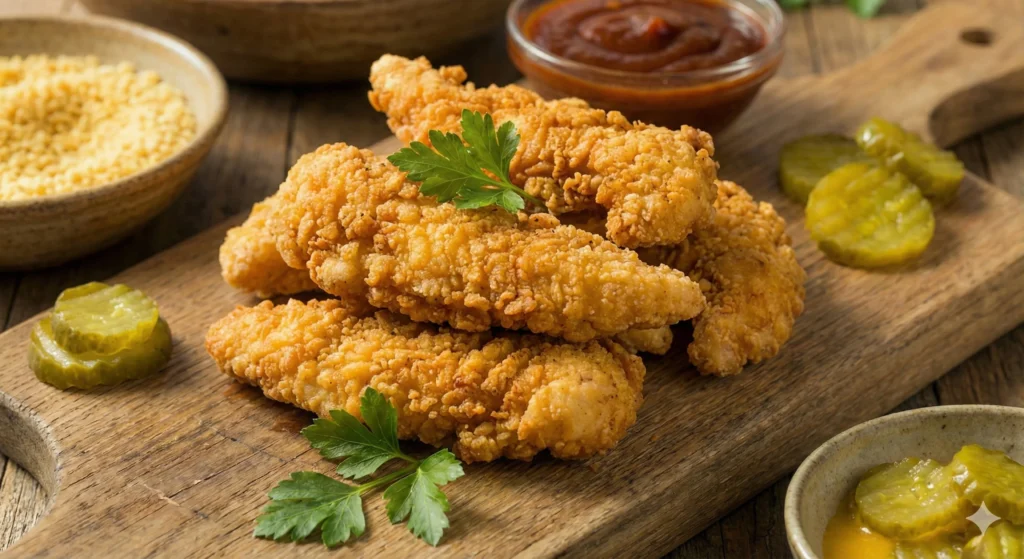
Crispy fried chicken tenders are a timeless favorite. They are perfect for any occasion, from family dinners to casual gatherings.
These golden, crunchy delights are easy to make at home. With the right technique, you can achieve restaurant-quality results.
Our recipe will guide you through each step. You’ll learn how to create the perfect crispy chicken strips.
We use simple ingredients and straightforward methods. This ensures that anyone can master this dish.
Whether you prefer frying or baking, we’ve got you covered. Both methods deliver delicious, crispy results.
Get ready to impress your family and friends with these irresistible chicken tenders.
Why You’ll Love This Crispy Chicken Strips Recipe
This recipe is simple yet delivers on flavor and texture. You’ll appreciate how quickly it comes together.
Each bite offers a delicious crunch paired with juicy chicken. It’s comfort food at its best, perfect for any day.
Here’s what makes this recipe stand out:
- Crunchy: Achieve extra crispiness with a double-dipped coating.
- Flexible: Bake or fry, depending on your preference.
- Flavorful: A spice blend adds a flavorful kick.
Try this easy yet impressive recipe, and it’ll soon become a go-to in your kitchen.
Ingredients for Crispy Fried Chicken Tenders
Gathering the right ingredients ensures your chicken strips turn out perfect. The better the components, the better the dish.
Start with quality chicken for the best texture and taste. Pair with fresh spices for full flavor.
Here’s what you’ll need:
- Chicken: Boneless, skinless breasts or thighs
- Buttermilk: Tenderizes and flavors the chicken
- Flour: Forms a base for the crust
- Spices: Paprika, garlic powder, onion powder, salt, pepper
- Oil: For frying, like canola or vegetable
Each ingredient plays a role in creating balance and taste. Once you have these, you’re ready to cook a memorable meal.

Step-by-Step: How to Make Crispy Chicken Strips
Creating perfect crispy chicken strips involves simple steps. Follow this guide for a delightful meal.
1. Marinate the Chicken
Begin by cutting the chicken into even strips for consistent cooking. Place the strips in a bowl or zip-lock bag.
Steps for marinating:
- Pour buttermilk over the chicken strips.
- Add a pinch of salt and pepper.
- Optional: Add a splash of hot sauce for a kick.
Let the chicken marinate for at least 30 minutes. This step tenderizes the meat and enhances flavor.
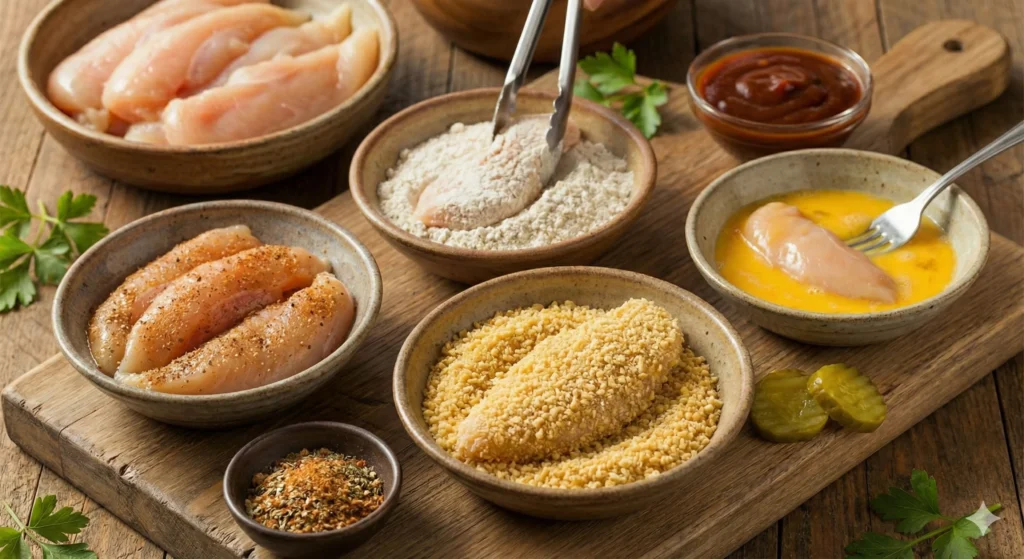
2. Prepare the Breading Station
While the chicken marinates, prepare the breading station. This setup ensures an organized process.
Steps for setting up:
- Place flour in a bowl and season with spices.
- In another bowl, pour additional buttermilk.
- Have a plate ready to hold the coated strips.
The key is using separate stations to avoid clumps. Organized preparation leads to crispier results.
3. Coat the Chicken Strips
Once your chicken is ready, start coating. This step locks in flavor and ensures crunch.
Steps for coating:
- Dip chicken in seasoned flour, shaking off excess.
- Submerge in buttermilk next.
- Return to the flour for a second coating.
The double-dip method provides extra crunch when cooked.
4. Fry (or Bake) to Perfection
Choose your cooking method: fry for tradition or bake for a healthier version.
Steps for frying:
- Heat oil to 350°F in a deep fryer or heavy pot.
- Carefully lower the chicken into the oil.
For baking, preheat the oven to 400°F.
Steps for baking:
- Lay strips on a baking sheet.
- Bake for 20-25 minutes until golden.
Each method delivers tasty and crispy strips.
Tips for the Crispiest Chicken Tenders
Achieving the ultimate crunch is simple with the right techniques. Here are some tried-and-true tips.
First, marinate overnight if possible. This infuses the chicken with flavor and tenderizes it further. Time is your friend here.
Second, ensure the oil is hot enough. Use a thermometer to maintain a steady temperature between 350°F and 375°F. Proper heat equals a crisp exterior.
Lastly, avoid overloading your pan or fryer. Crowding leads to uneven cooking and soggy results. Cook in small batches instead.
Quick Tips for Crispiness:
- Double-coat the chicken in flour.
- Let the coated chicken rest before cooking.
- Opt for panko breadcrumbs for added crunch.
Resting the strips after cooking is important. This allows juices to redistribute, keeping the inside juicy.
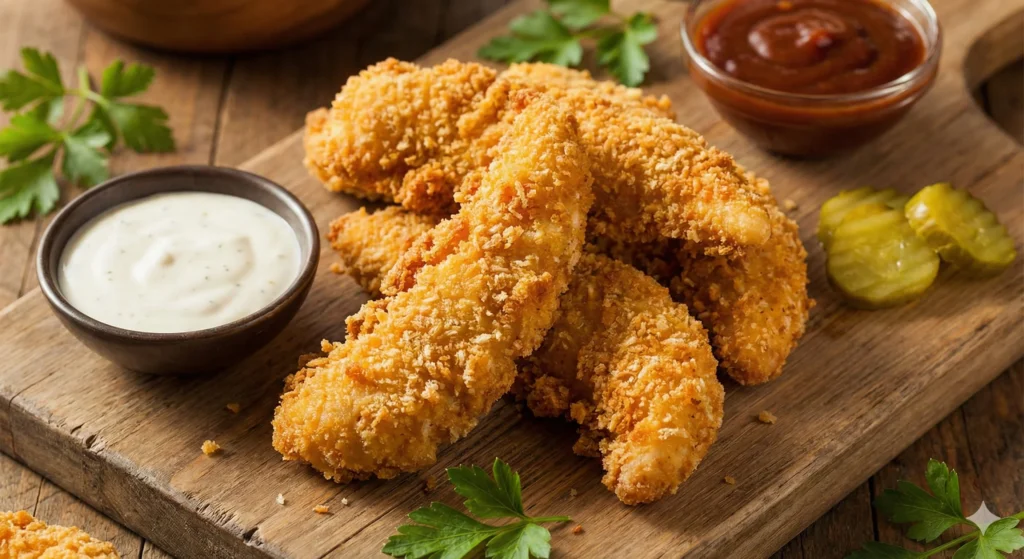
Dipping Sauces and Serving Ideas
Elevate your crispy chicken strips with an array of dipping sauces. Each sauce adds a unique flavor twist to your dish.
Classic choices like honey mustard and ranch are always winners. They offer creamy, tangy profiles that complement the crispy texture.
For something bold, try a spicy buffalo sauce or a smoky barbecue. These add heat and depth to your meal.
Popular Dipping Sauces:
- Honey Mustard
- Ranch
- Spicy Buffalo
- Smoky Barbecue
Pair your chicken with sides for a complete meal. Consider fresh coleslaw or crisp fries to balance the richness.
Variations: Make It Your Own
Customize your crispy chicken strips with different flavors and textures. Add a personal touch to suit your taste.
Consider spicing things up by adding cayenne pepper to the breading. This gives your chicken a fiery kick.
Try swapping the regular breadcrumbs with crushed cornflakes. This provides an extra crunchy texture that’s highly satisfying.
Creative Variations:
- Add cayenne pepper for heat
- Use cornflakes instead of breadcrumbs
- Incorporate grated Parmesan for a cheesy twist
Experiment with these ideas to discover exciting new flavor profiles. Your family and friends will appreciate the variety in taste.
Storing and Reheating Leftovers
Keep your leftover crispy chicken strips tasty for later enjoyment. Store them properly to maintain their delicious texture.
Place the cooled chicken strips in an airtight container in the fridge. They’ll stay fresh for up to three days.
Reheating Tips:
- Use an oven at 350°F for best results
- Heat until crispy on the outside, warm inside
- Avoid the microwave to prevent sogginess
Following these steps will ensure your leftovers taste just as good the next day. Enjoy a second serving without sacrificing crunchiness!
Frequently Asked Questions
Wondering about the best flour for crispy chicken strips? A mix of all-purpose flour and cornstarch is a great choice.
Have you ever wondered if air frying is better? It’s a healthy alternative and still gives a delicious crunch.
Common Questions:
- What oil is best? Use peanut or canola.
- How long should they fry? About 5-7 minutes until golden.
- Can you freeze them? Yes, freeze before or after cooking for later use.
These tips should help you enjoy crispy fried chicken tenders anytime!
Crispy Chicken Strips Recipe Card
Making perfect crispy chicken strips at home is easier than you think. Here’s a quick reference to get you started. First, gather your ingredients: boneless, skinless chicken breasts, buttermilk, all-purpose flour, and a blend of your favorite spices. Begin by marinating the chicken in buttermilk for at least 30 minutes. Prepare your breading station with flour seasoned with paprika, garlic powder, and onion powder. Coat each strip thoroughly. For a deliciously crispy crust, try double-dipping by dunking in buttermilk again before a second flour coating. For frying, heat oil to 350°F; for baking, preheat the oven to 400°F. Cook until golden brown and ensure the internal temperature hits 165°F. Enjoy your hot, crispy fried chicken tenders with a side of honey mustard or ranch dipping sauce.
Ingredients List:
- Boneless, skinless chicken breasts
- Buttermilk
- All-purpose flour
- Spices (paprika, garlic powder, onion powder)
- Cooking oil or oven for baking
Now you’re ready to create a delicious feast everyone will love!